|
Exporting to QuickBooks
|
|
All monetary transactions can be exported from InsurancePro to QuickBooks, a commonly used business accounting software. Before exporting any transactions into QuickBooks though, the InsurancePro accounts must be set up so that the account names in InsurancePro correspond with the account names in QuickBooks' Chart of Accounts.
|
| |
|
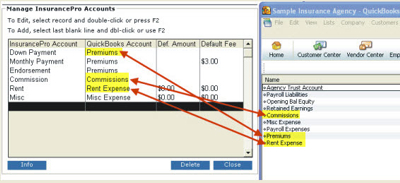
To set up the accounts in InsurancePro, select "Options" from the main menu. Then select "Set up InsurancePro Accounts".
|
| |
|
The account name listed under the "QuickBooks Account" column in InsurancePro must be typed in exactly as it is in the QuickBooks Chart of Accounts list.
|
| |
 |
| |
|
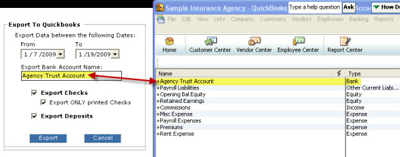
After the above step is completed, you are ready to export to QuickBooks. Click on "Options" from the main menu, then click on "Export Data to QuickBooks".
|
| |
|
The next screen will prompt you to enter a date range for the transactions you wish to export. We recommend you export one day at a time. We also recommend you do not export the current days transactions. In doing so, InsurancePro will list each receipt as a separate deposit instead of totaling all receipts under one deposit.
|
| |
|
Next you will specify the Bank Account Name as it is listed in QuickBooks. This is the bank account you want the transactions to be exported to. It is essential the bank account name is typed in exactly as it is in the QuickBooks Chart of Account's list.
|
| |
 |
| |
|
When ready, click on the "Export" button. InsurancePro will ask you to specify the location on your computer to save the export file - "IPtoQB.iif". Be sure to note where you store the file.
|
| |
|
After the data is exported successfully, open your QuickBooks software and choose the option to import a file. Specify the location of the IPtoQB.iif file and QuickBooks will import the data from InsurancePro.
|
| |
|
For additional information, check out our online help file for Exporting to QuickBooks by clicking here.
|
| |
|
Please note: We are not exporting to the QuickBooks online version at this time.
|